Showing posts with label repair. Show all posts

Tuesday, 24 December 2013

A (Christmas) Magic Smoke Event . . .

I have recently been giving one of my "old ladies" in the guise of my 1982 vintage FT-101ZD Mk3 a "run out", promoting it to "main station rig" status for a few days despite the fact that I am aware that it is still in far from perfect working order.

It's basically a nice set, so that was no major sacrifice.

However, after the radio had been on for a few hours I suddenly started to get a distinct smell of "something" from it. I've smelt very many electronic faults in my time, but this one seemed rather to smell of a pan on the stove burning dry, but I quickly realised that there was no pan on the stove in the kitchen, and that the smell was indeed coming from my '101.

I removed the power and found a flashlight so I could investigate the cause, and spotted a little plume of smoke emanating from the left hand rear of the rig, and I also noticed that this corner of the rig seemed to be rather warmer than normal.

Straight away I disconnected all the external cabling, and, having allowed a reasonable time for the internal high tension power supply to discharge, I removed the top cover thinking that the sooner I could get at the innards, the more likely I was to identify the source of the problem.

Thus I homed in on the "Rectifier B" board and quickly spotted a rather distressed looking electrolytic capacitor which also seemed to be unusually warm to the touch.

Rectifier B Board in situ - PB-1968B

Now it may be recalled that this radio, bought originally as a “spares or repair” item from EBay, has had a chequered history having done questionable service as a high powered and illegal CB rig. It had no doubt been abused, quite possibly by someone less educated in the finer arts of the tuning and conservation of valve/hybrid rigs, this abuse being most keenly felt by the power supply stages. I had already rebuilt the “Rectifier A” board which had expired completely, and it now appears that I should have paid rather more attention to the “Rectifier B” board, which supplies screen and grid bias supplies to the output stages.

My own fault and hopefully any collateral damage will be minimal.   Looking on the bright side, as one of my “Twitterati” so nicely put it, at least it was “Christmas Magic Smoke”!

Sunday, 27 November 2011

TS-180S - this is getting ridiculous!

I knew it was a mistake putting the lid on properly.
Having restored the functionality of the frequency display I decided to run the radio for a few hours over the weekend to evaluate performance further.   Still no tx, of course or any PLL locking on 28MHz but I knew that already ...
I was listening to a QSO on 7MHz this morning between a very strong Belgian station and a string of UK stations, most of whom I could hear reasonably well when I realised that the frequency seemed to be locked on to 7.150.0MHz.  Tuning either side by a kHz or two made no difference to the display.   I had a funny feeling about this, so I tuned up and down the band to find that lo and behold that the display was only displaying frequency to a 10kHz resolution!
To see whether this was a heat related issue I switched the radio off and let it cool down for half an hour or so, but on re-powering the fault was still present, so I have concluded that I have ANOTHER dead chip!  More than likely a duff 7490 in the counter chain, and that's TTL not CMOS, so another theory goes down the pan.
It is now only sheer stubbornness which is sustaining my interest in this project.  In all the years of building and repairing equipment, I don't think I've ever come across a project like this.   Trying to fix up a radio with numerous faults is one thing (and what I thought I was dealing with here), but fixing one which keeps breaking seemingly randomly whilst under repair is quite something else.   It's a case of either "nolum illigitimus carborundum", or chuck the bloody thing in the (recycling) bin!  I don't give up easily though.  What kind of trauma has this radio suffered in the past?   It's anybody's guess.

Saturday, 26 November 2011

TS-180S Display Fixed (Again!)

As I reported previously I discovered that the display in my TS-180S which is currently undergoing major restoration was again faulty.

The symptoms were either that it displayed just the "base" frequency of the band in use when it was powered up, "1.500.0" for example on Top Band, "3.500.0" on 80m, or another sequence of numbers unrelated to anything.  None of these numbers changed when the bandswitch was operated with the set switched on.

A couple of nights ago I decided to have a look with my test gear to find out what was going on, or not.

The trickiest part of the whole operation is extracting the display from the radio, and conversely refitting it after investigation, and this struggle led me to suppose before I started that the fault was induced during the arduous refitting after the previous repair, and the consequential tidying up of the cable harness.

This was soon proved not to be the case as investigation with an oscilloscope quickly led me to the conclusion that (a) there was plenty of 40-40.5 MHz signal from the premix unit but (b) there was no gate signal in the digital counting chain.

So attention returned to the previously repaired divide unit which sits underneath the main counter board, and so consequently the whole caboodle had to be extracted once again from the radio so I could get at it.

Well at least I was well practiced at this, and knew what to do (familiarity doesn't imply enjoyment!), so eventually, after cutting some of my nicely installed cable ties, and much cussing, I had the recalcitrant unit upended so I could investigate.

TS-180S Display Divide Unit
The marked up drawing above shows what I found, and I quickly came to the conclusion that either Q8 or Q9 would appear to be faulty, with the balance of probabilities suggesting Q8.
 
Fortunately a trawl through my spare parts revealed that I had a 4013 (Dual D-Type Flip-Flop) and also a 7400 if required, so I had a "cunning plan" to replace these parts in the radio the following evening.


Divider Board - Q8 Bottom Right
 
And so it came to pass.  The following evening Q8 came out as sweet as a nut (it was helpful that it was in the corner of the board and no immediately surrounding components, a new 14-pin turned pin socket was soldered in and the new chip installed.
 
Powering up the radio followed and to my great delight the correct frequency display appeared!  Yay!
 
Display Correct (note - upside down!)

Display ready to go back in ...

The display has now been refitted and is working as I type this, so after much effort, I am now back where I started and wondering (a) what on earth will go wrong next? and (b) how can one radio have had so many seemingly unrelated faults?    The only connection I can think of between this fault and the previous repair to the divide unit is that both of the faulty chips were CMOS types of presumably similar vintage?  Maybe the anti-static handling precautions at the factory weren't up to much at the time?
 

Faulty Q8 - Innocent Looking, eh?


Saturday, 16 July 2011

TS-180S : Part 6 - Life Moves On ... (things looking Black!)

Since my last post more hours have been expended on this old radio.  To summarise :-
Numerous hours spent with the TS-180S connected to an aerial simply being a receiver.   The purpose of this was fourfold ;
1) Get some hours on the clock to see if any further "corrosion related faults" arose (they didn't)
2) To evaluate the intrinsic frequency stability of the transceiver (it proved to be acceptable for the technology of the day)
3)To evaluate its performance as a receiver (it lacks sensitivity - a lack of IF stage gain is prime suspect)
4) Allow me to ponder how to tackle the lack of transmit output (there is a very small amount of RF transmitted, but I think I need to tackle the suspected IF gain issue first as part of the IF is used in the transmit chain)
Anyhow with all this input to my overloaded brain I resolved that the time had come to put this project on the back burner therefore allowing me to move other projects on as I perceived I was becoming somewhat obsessed with this one!
Having made that decision I decided I would reunite the radio with its covers, albeit temporarily, and that is when I noticed something I had missed.  There on the bottom half of the case, on the inside was pretty conclusive evidence of some kind of "spill" which had pooled in the bottom of the case leaving a residue!
Ha!  I think my earlier suspicions have been proved correct.  Judging from the size of the marks inside the lid, it was clearly a sizable spill.
When I return to this project it will be armed with that knowledge, and I will need to bear in mind what other damage may have been done, and seriously consider what the chances are of a full restoration without a ridiculous amount of expense.

Saturday, 2 July 2011

TS-180S - Part 5 - Swimming Against the Tide

Well it sure feels like it!

Having restored receive functionality to this old set, and having then established that the transmit function was u/s, I set about figuring out a strategy to find out what the problem, or more likely problems were which prevented me from transmitting.

You always need a strategy of some sort, and I wanted to come up with one.   The most obvious thing I noticed at this point was that the ALC reading on the metering was "pinned" when I put the set to transmit.

This could be cause, or a symptom.  Anyway, some place to start, a little piece of evidence to build on.

Whilst all this was going on in my head, the radio was powered up and receiving lots of signals.  I began to notice an unusual tone to the received signals, and upon investigating this I realised that the frequency had developed a nasty "wobble", jumping about by small amounts.  I also noticed that the radio was pulling around 100mA more current from my  power supply than it used to, so something was clearly wrong.

I established fairly quickly that the 8V regulated rail from the AVR unit had increased to nearly 9V and was fluctuating.  It was possible to trim this back to 8V but the fluctuations continued.  This is when I noticed Q6 on this board running VERY hot.

Further investigation of voltages around the circuit established that the Q6/Q7 pair (the shunt voltage regulator error amplifier) was "up the creek" (Remember Q5 in this circuit was one of the first faults I found on this set).

Q6 was found to be short circuit from collector to base, and when Q7 was removed, I found ANOTHER case of "rotten transistor leg syndrome".

I am very suspicious now that at some point in the past this transceiver had some unpleasant, corrosive liquid spilt into it, or something of that nature way back in it's past.   That might explain a thing or two ...
Dead Q6 at the top (base lead looks "iffy too!) Q7 with collector lead (middle) almost eaten through.  The 180 ohm resistor R11 is absolutely fine.

Replacing both of these transistors has restored everything to normal - 2N3704s used to replace the 2SC945s - the base and collector terminals just need to be transposed.

Right, where were we? . . .

Friday, 24 June 2011

TS-180S Repair - Part 4 - That's More Like It!

Great progress to report, and more dead bits!

The frequency counter unit is now working properly.

The two DC-coupled "front end" transistors in the 40MHz amplifier section were suspected as being faulty and were replaced. No exact replacements or direct equivalents were to hand, but looking at the specifications of the original units (2SC460) I figured that more or less any old small signal RF transistor would do, and as I had a bag full of MPSH-10s in my spares box I used those. The pinouts are incompatible and I ended up mounting them under the board.

Anyhow to my great delight the frequency counter then appeared to work, albeit not quite properly. The frequency count was correct at the bottom band edge (e.g. 7.000MHz) but when I tuned a signal at 7.100MHz the counter read 7.060MHz, near as makes no difference. This was consistent across all bands. The counter was proportionally out of kilter receiving at 7.200MHz, the counter reading 7.120MHz

Owing to the frequency scheme in use in this transceiver, and the fact that basically the counter is fed with frequency of 40.0 to 40.5MHz as the VFO is tuned across each band I figured there was a counter timebase problem.   The microprocessor logic in the counter unit adds the base frequency for each band to the difference between the 40.0 to 40.5MHz and 40MHz producing the correct frequency on the display.
Underside view of Counter Unit
Investigation of the divider part of the circuit revealed a problem with Q5, a CMOS BCD counter (4018) which was producing an output of 83Hz instead of the required 50Hz. Ha! That explained everything!  The frequency being too high would mean a shorter gate time for the counter than is required, and hence the frequency count would be too low.  This signal goes through a further division-by-10 process (a 7490 TTL chip) before the 5Hz, or in the case of this faulty radio 8.3Hz gating signal is sent to the counter signal chain.

Oscilloscope display of output from faulty Q5
The repetition rate of the waveform should be 20ms not 12ms!

Below:- the replaced Q5 - the replacement has obviously been in my spares box for quite a while!


This faulty chip has now been replaced, and the counter is now functioning correctly, and I'm feeling very happy with the way this repair is shaping up.


Here is the old girl on the "operating table" ..

I'm just about ready to see if the set transmits ...
Latest update - no it does't,  so it's on to the next fault (again!) ...

Monday, 13 June 2011

TS-180S Repair Part 3 : Recovery in progress, but the Body Count is Increasing ...

I am aware that it has been a while since my last update on this subject, but work has been progressing quietly in the background as my limited free time has allowed. At least once careful consideration was given to this old lady "becoming a projectile", or to be more serious whether a time was approaching when I would could my losses and put it to one side as it seemed to be taking over my life! However after a brief break I rolled up my sleeves and carried on ...

I am pleased to report that this transceiver now works as a receiver, albeit not on all bands yet, and the frequency display isn't functioning. The time is fast approaching when I will check out the transmitting capability and performance of this venerable transceiver.


The replacement of the dead 2SC1907 in the Q14 position (PLL WBA) allowed me to move on to the next fault (there always seems to be a "next fault" with this radio!) - it still appeared that the PLL circuitry was the problem area.

I revisited the Premix Unit, and although all the various signals appeared to be there I was not convinced that the RF levels were all that they should be.   The Service Manual is rather vague on expected RF levels, though it is very good at expected DC levels around key parts of the circuitry.

Meanwhile, back at the PLL Unit I discovered that the amplified VCO outputs which are fed to the Premix Unit were suspiciously low whereas the VCO output levels themselves seemed to be reasonable.

TS-180S - PLL Circuit (Part)
Attention was therefore drawn to the output stage of this part of the circuit (see excerpt from the circuit), and probing around with my DVM revealed that Q2 (another 2SC1907) had just over a volt between its base and emitter and that Q3, the "unlock output mute" transistor had no volts on its collector.  The other voltages were not very close to those suggested by the Service Manual.

Small signal transistors with a volt showing across base and emitter simply aren't transistors any more (it's a kind of Law of Physics!) and clearly the load choke of the mute transistor was open circuit.

The transistor and choke were replaced, and the radio burst into life! Furthermore, replacing the components restored the DC voltages to being very close to those suggested by the Service Manual, an interesting lesson there for future use. (Note to self:- check the DC voltages first!)

It is interesting to ponder that both of the u/s transistors found so far in this circuit were identical types.  This possibly suggest a quality issue with the manufacturing as I strongly suspect they would have been made at the same time, more than likely from the same piece of material.   Worryingly there are a few more 2SC1907s in this radio!

 Now I have a radio which appears to work as a receiver on most but not all bands - there appear to be some alignment issues still with the PLL, but the frequency display now just shows the "base" frequency for each band, in short the counter isn't working.

I spent a little bit of time investigating the counter issue, and again I am not convinced the signal levels are quite sufficient.  The counted signal is a 40-40.5 MHz VFO-locked signal from the Premix Unit and has to be amplified to a sufficient level to interface with TTL (yes, TTL!) chips, and I don't think this is quite happening, but when I lifted the circuit board to investigate the underside I had a bit of a shock!

TS-180S - counter underside

The components underneath were a surprise, and suggest that the layout of this board isn't what you would call "Kenwood's Finest Moment"!.  However to be fair the added bits are shown in the Service Manual layouts, if you look carefully, and are, in the main added decoupling components to the TTL chip supply pins, or the tying down of unused pins.

Re-sweating some suspicious-looking joints and plated-through holes didn't appear to make any difference, but it's early days yet ...

Saturday, 19 March 2011

Bringing the TS-180 Back from the Dead - Part 1: The Darndest Fault!

Some little time ago I purchased a "Spares or Repair" Trio-badged TS-180S from an eBay Trader, the price I paid reflected its non-working condition.    I didn't know very much at all about the TS-180S at the time but fancied a challenge.

As I've put my Eden9 70MHz transceiver on the "back burner" for a while and cleared one or two other repair jobs, I finally decided that the time was right to make a start on the '180S.

A preliminary look under the lid on the day the radio arrived revealed that the radio was totally u/s.  The famous Trio/Kenwood "dots" on the display on all bands, and a quick poke around with a DVM revealed that the regulated outputs from the "AVR" board were all over the place.  The whole thing smacked of multiple problems so I was anticipating a bit of a struggle.  The radio may yet prove to be Beyond Economic Repair, only time can tell if that is going to be the case.

Forearmed with this knowledge I decided to have a look at the AVR board for starters.

This consists of three regulator circuits.   One is a DC-DC converter which produces a light duty negative rail.   This appears to be working fine.

The other two parts are shunt regulators (oh dear, I dislike shunt regulators!) producing 8 volts (adjustable)  and 8.1V (non-adjustable) respectively.   These were producing 5 and a bit volts which didn't respond to adjusting and 8.9 volts respectively but are independent of one another save for the fact that the unregulated input rail is common to both.

As it seemed to be the most out of kilter I decided to look at the 8V adjustable supply first.

Having scribbled the circuit out on a pad and made some voltage measurements and jotted them down I homed in on what I felt would be a likely candidate for being faulty.   Shunt regulators are pretty horrible circuits in my view, not so much due to their complexity (they aren't usually all that complex) but due to the way the various stages (voltage reference, error amplifier, regulator driver and regulator) are wrapped up in a tight loop and DC-coupled, fault finding on them can be tricky as a fault in one part of the circuit ripples right through the circuit cutting off or destroying transistors and causing Magic Smoke to be lost from the system.

I didn't appear to have any overstressed components in my circuit, but I certainly appeared to have transistors which were just acting like resistors so I took a punt on the regulator driver being a suspect worthy of investigation.   What I found amazed me.

I removed (or so I thought) some solder from the PCB pads under Q5 the suspect device and tugged on it from the top, and away it came fairly easily.     However I noticed that the transistor legs seemed to be somewhat corroded, surprisingly, and I cleaned them off a bit with my pliers and tested the transistor on my DVM.  It looked absolutely fine.

Well I wasn't 100% convinced that Q5 was the culprit, and with it removed from the circuit, it would make the results of some other resistance tests on the remainder of the circuit easier to interpret, so I wasn't too discouraged.   However, when my attention returned to the board I noticed that I had actually de-soldered the wrong components, probably due to my not having been able to find my near-distance glasses!    The corroded remains of the transistor legs were still firmly attached to the PCB.

I managed to find a similar transistor to the original Japanese one in my junk box and eventually after some mental gymnastics with the different pinout replaced the original unit and re-soldered the remaining components.

The 8V regulator now works and is adjustable, so the original transistor must have had such badly corroded legs that it must have just basically appeared as a resistor network to the circuit.   I've never come across anything quite like that before in my fault-repairing experience.

Even better news, with the 8V supply restored, the radio is now showing some signs of life.   The PLL appears to lock on some bands (10,14 and 21MHz, though not across the whole band.

Nothing is being received even with the PLL locked, but it is a start!

I still have to figure out where the corrosion which ate the legs of the transistor came from - perhaps something liquid was dropped through the grille of the external case (this board is directly under the vent grille as it generates a reasonable amount of heat)?

Thursday, 3 March 2011

Thank Goodness for Electrolytic Capacitors (they keep lots of folk in work!)

I'm on a bit of a roll as far as fixing stuff goes.

 
The latest bit of gear to succumb to my endeavours is an old D-Link DE-812TP Ethernet hub rescued from the scap pile at work and which had failed in industrial use. It was being discarded as being "beyond economic repair".  Had the unit been somewhat more youthful it may well have gone back to the company's repair shop but as it dated from 1997 it was regarded as "consumable" and should have been destined for recycling.  In a previous life (or so it seems) it could well have been down to me to repair the hub myself!


Seeing an opportunity to acquire a potentially useful piece of equipment at no cost, and, frankly, fancying the challange,  I opted to have a quick look at it, as having seen the fault symptoms I thought there was a reasonable chance of making a repair.


The fault symptoms were rapidly flashing LED indicators (ALL of them were flashing) which strongly suggested a power supply fault.   There appeared to be no blown fuses either, a good sign.


Opening up the unit I discovered a small switched-mode power supply on a separate sub-board bearing a strong resemblance to a standard computer type supply, albeit a miniature version, without cooling fans and the like.   The general arrangement looked very familiar so confidence was high.


The first step was to prove that the main motherboard was OK, so I disconnected the built-in supply and provided a temporary 5V feed to the motherboard which immediately sprang into life with "normal" indications on the LEDs.   I was now more confident than ever that the PSU was the culprit so out it came for a closer examination.


Not having the circuit I had to make rough guesses about where and what the various circuit sections were, but I quickly identified what was probably the main capacitor filter section for the +5V supply and decided to test the reservoir capacitors with my Peak Electronics ESR60 Capacitor Analyser.   Years of experience of repairing electronic circuits teaches one to suspect electrolytic capacitors before anything else!   Strange readings were obtained with the capacitors in circuit (this is often due to other components connected to and across the capacitors and doesn't necessarily mean that there is a problem), so I unsoldered and removed them from the PCB in order to check them out of circuit.


See the photo below.


Once capacitor came out minus one of its legs (not a good sign!) and the other measured "Low Capacitance" on the meter.  They were both branded as 1000uF 16V units.    There was possibly some evidence on the PCB in the form of a small light brown stain resembling a drop of dried out spilt coffee that there may have been some electrolyte leakage, but it was clear that both of these capacitors were u/s.   As you can see from the photo they were also branded as 105 deg C capacitors so it would have been reasonable to expect a long life from them.    Still the hub had been in service 24/7 for around 12 years which I suppose is reasonable.  Around 100,000 hours of  continuous operation before failing.   As the two capacitors are connected in parallel in this circuit one can ponder that perhaps they had been dying gracefully for some considerable time, but one never knows.


Happily, the capacitors were replaced with new units purchased cheaply on EBay, and the PSU and its parent hub are now back up and running, seemingly as good as new.

Saturday, 19 February 2011

A "Doing" Day (in the shed)

A few days ago a Skype message from one of my small group of "Skypees" alerted me to the fact that an equipment failure had occurred. Jim's 30 amp power supply was no more. I was being asked what I thought about a couple of possible replacements, but as I enjoy the challenge of "fixing things", and also generally far too parsimonious to countenance replacing something old with something new without at least putting up a fight, the Skype conversation quickly got round to the faulty equipment and to what might be wrong with it.

With almost astonishing speed I was appraised of fault symptoms and then a copy of the circuit diagram. It was completely dead. Nothing coming out of it, apparently. Nil. Zip. Nada. Not even "magic smoke".

The circuit diagram was examined and I figured out some likely causes, all which seemed to be fairly straightforward to resolve, and so it was arranged that I would call in to see my friend when I was passing his home a few days later.

In the meantime, my friend proceeded to purchase a replacement unit (a hundred pounds, near as dammit!) and was very pleased with it.

The broken power supply was duly collected yesterday afternoon, and today I decided to take a look at it.

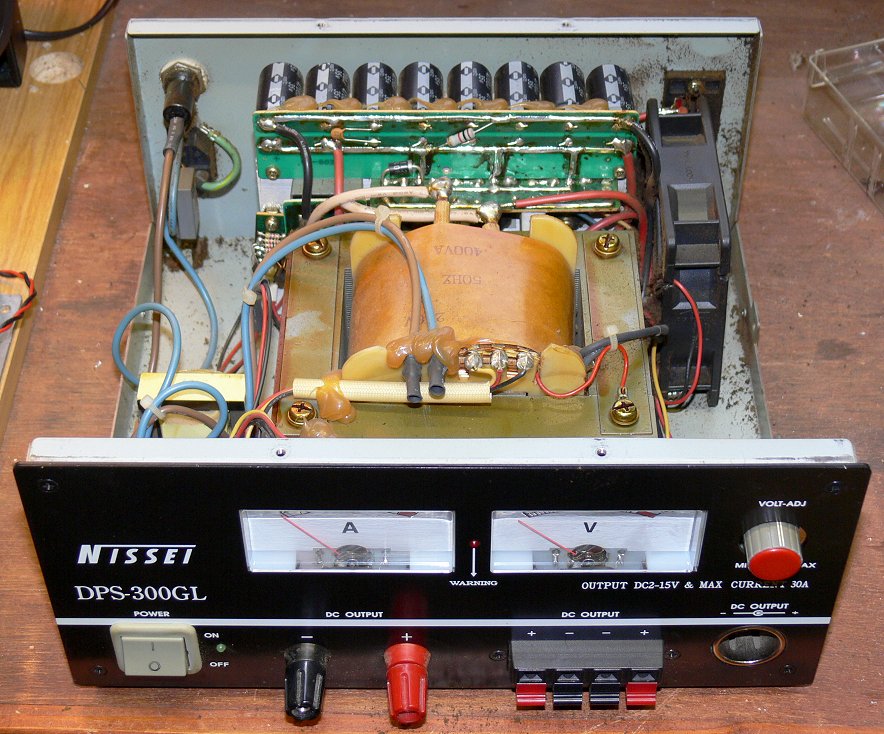
The power supply is called a "Nissei DPS-300GL" and is quite a hefty beast. Opening it up I found it to be quite nicely constructed, albeit rather grubby as the cooling fan had been dragging unfiltered air in and across the internal heatsink for many an hour. However, no matter what the outcome of my efforts was, the fan would drag no more air as it was completely seized up beyond redemption.


Inside the Nissei PSU (quite neat isn't it?)


My earlier deliberations had led me to suspect a problem with the overvoltage circuit, but I adopted a technique I have used on many occasions to prove or otherwise the general health of power supplies, and that was to connect a current limited supply at the correct DC voltage across the main rectifier output. Encouragingly this brought the majority of the power supply to life, at the same time lending weight to my original theory about the overvoltage tripping circuit which was fed from a completely separate supply via its own transformer.

Next I moved the external supply to the rectifier in the overvoltage circuit, and to my slight surprise the "enabling" relay (the overvoltage trip drops out the relay which removes the AC mains supply to the main power supply transformer) was heard to operate. My original theory was that there was a fault with this relay, or its associated driving circuitry.

Fortunately this piece of circuitry is built on its own separate board and was relatively easy to extract and examine.

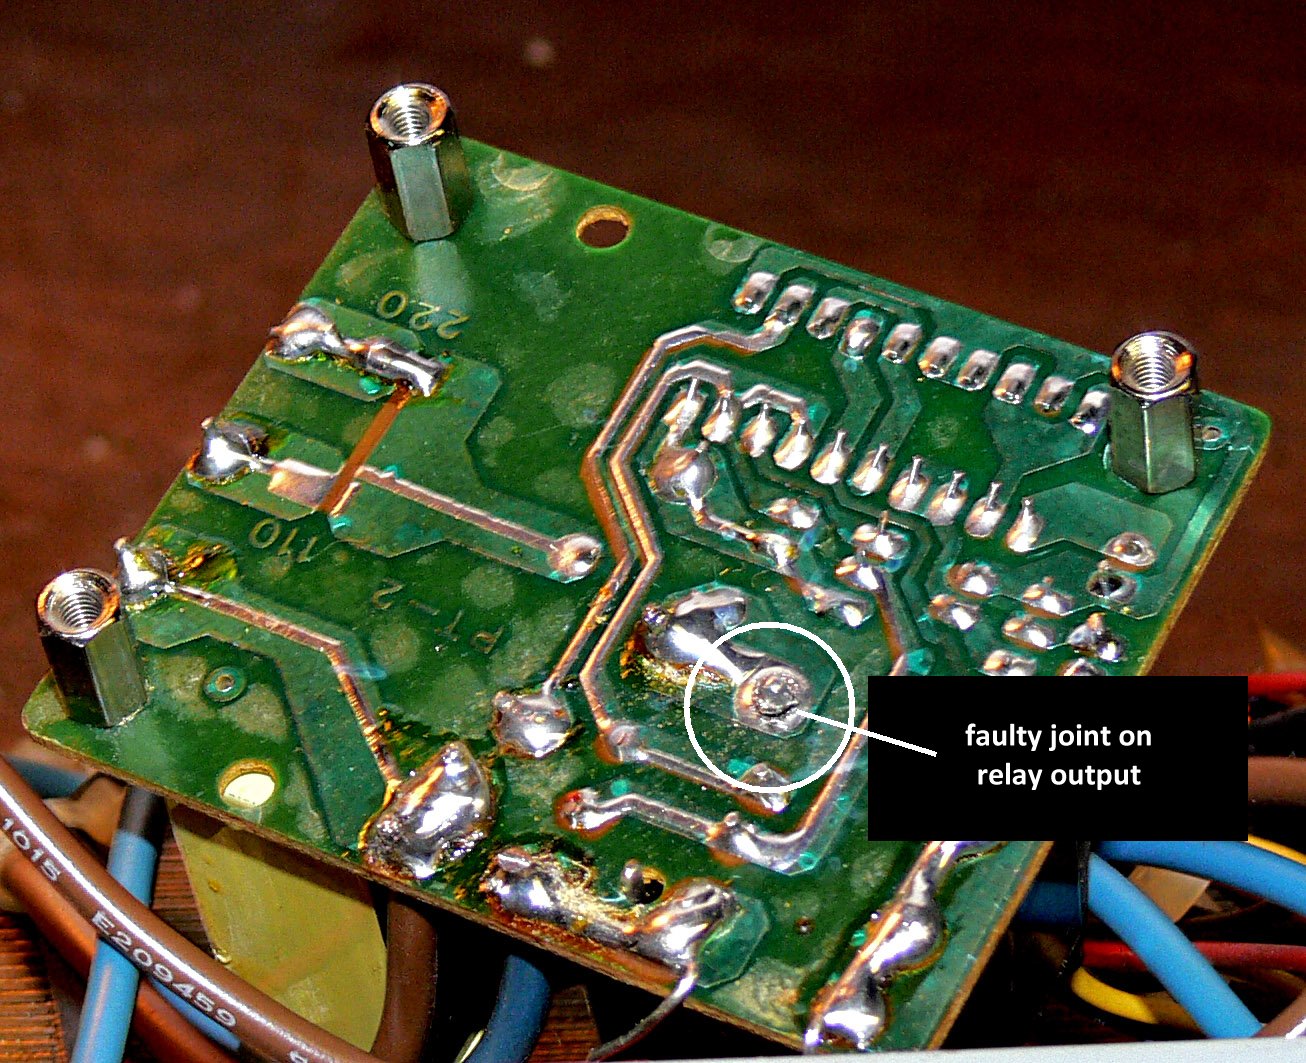
It didn't take long with an eye-glass and a multimeter to get to the root cause of the problem - see the attached photograph.
Underneath the Overvoltage Board ...

A nasty looking joint at the relay contact which switches the AC mains to the main part of the power supply. Bingo!

The joint was cleaned up and resoldered, the overvoltage circuit returned to its rightful place, the PSU powered up from its own mains supply, and lo and behold the PSU is now working, albeit temporarily without a cooling fan.   I realised at this point that the description of the original fault symptoms must have been slightly wrong in that the trip relay would have been heard to operate upon the application of mains, and I didn't verify this myself. Having said that this might have made me more worried about what the cause of the fault was!

Having spent a few frustrating minutes wrestling with Maplin's web site looking for a replacement,  EBay was consulted, and a 92mm 12V DC fan was quickly found and has been ordered for the princely sum of £4.99 (including postage!).

Soon Jim will have a spare power supply.

Right!  On with the next job ...

Today is the day I finally decided to start building my "X-lock", a VFO stabiliser kit from local firm Cumbria Designs.   I've had this "in stash" for quite a while as other projects have got in the way.  Once built I have then to decide which rig of my various"old ladies" will get the benefit.  At the time of writing I think it will be my FT-107, but that is by no means certain.   I also have it in the back of my mind to build the version described by Eamon Skelton EI9GQ which seems to be a variation upon the same theme.   Still, that will be a way off as I still have to "cut my teeth" properly with PIC programming, another medium-term objective of mine.  It will be interesting comparing the performance of the two units, and the advantage of the EI9GQ version is that the PIC source code is in the public domain, and I would have the opportunity to experiment with it.
X-Lock construction under way

Anyhow construction of the X-lock has now commenced, hopefully it can be finished off tomorrow, with luck.